The video “Making the Glossary interaction available throughout the course in Adobe Captivate 6,” which you can view here, explains how to show the glossary widget on any page of a project and pause the slide at the same time. Pausing allows the user to focus on the glossary without missing any of the slide’s content. When you click the close button, the glossary is hidden, the slide unpauses, and then resumes playback. Unfortunately, using this method to show/hide the glossary can be a problem if the slide is already paused because you need the user to do something first. Because pressing the button to hide the glossary unpauses the slide, the user won’t be able to complete what you needed them to do when the pause was implemented. This article explains how to conditionally show/hide the glossary which eliminates this problem.
I’ve implemented the show/hide glossary method in a lot of online trainings. I’ll implement the method for help systems, resources, and activities where I need elements to appear on multiple slides, but slides resuming when I need the slide to stay paused is the biggest downfall. My most common instance of a slide being paused and waiting for a user to do something is a button placed at the end of the slide waiting for the user to click it to move to the next slide. If a user shows/hides the glossary at the end of a slide they’re generally confused about why they advanced to the next slide since they didn’t press the Next button. Fortunately the solution is relatively simple.
You can download the Captivate 9 project file here.
BUILDING THE SLIDE
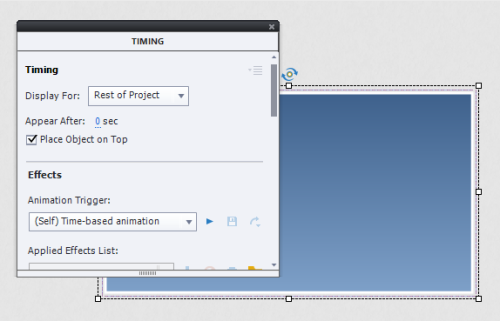
Starting with a new project we’ll just have a single slide. We’ll add a single smart shape that covers a good majority of the slide and set the timing of it to Rest of Project and check the box for Place Object on Top.
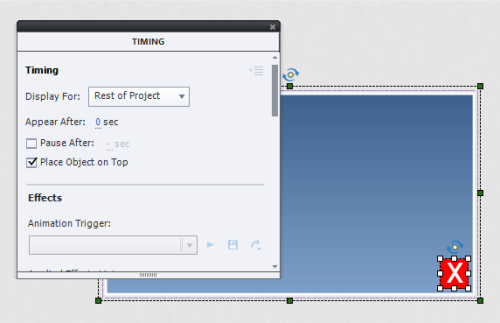
Then we’ll create another smaller smart object and use the same timing settings. For the first object I’m just using a gradient fill and the second object I’m filling with red and adding an “X” to indicate that it’s the close button. Then group the objects together, name them “AllProject,” and set the visibility to hidden.
Now we’ll add a button to the slide, name it “Paused,” position it so it pauses at 10 seconds, turn on the “Stop Slide Audio” option, and change the option to “When Paused.”
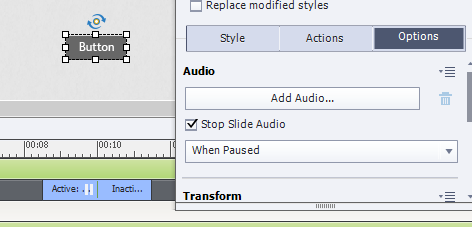
Pause button settings
VARIABLE AND ACTIONS
The default method outlined in the YouTube video only uses two standard advanced actions. For this process we need to use two conditional advanced actions and a variable. First we’ll create a variable that will only change when the project isn’t already paused.
Create a new variable named “v_ProjectPause” and set the value to 0.
Now for the two conditional advanced actions. The first action is used to pause the project only if it isn’t already paused but shows the AllProject group regardless. Create a conditional advanced action named “ItemShow,” name the first decision “CheckPause,” and use the following settings:
IF
[variable] cpCmndPause is equal to [literal] 0
ACTIONS
Assign v_ProjectPause with 1
Assign cpCmndPause with 1
Name the second decision “Show” and use the following settings:
IF
[literal] 1 is equal to [literal] 1
ACTIONS
Show AllProject
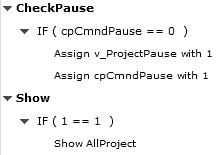
Preview of the Item Show action
The second conditional object will only unpause the project if the v_ProjectPause variable is equal to 1 and will hide the AllProject group regardless. Create a second advanced action named “ItemHide,” name the first decision “CheckUserPause,” and use the following settings:
IF
[variable] v_ProjectPause is equal to 1
ACTIONS
Assign v_ProjectPause with 0
Assign cpCmndResume with 1
Then name the second decision to “hide” and use the following settings:
IF
[literal] 1 is equal to [literal] 1
ACTIONS
Hide AllProject
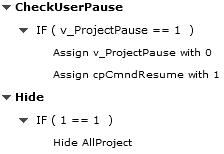
Preview of the Item Hide action
SHOW/HIDE BUTTONS
The last part is creating a button to show the AllProject group and assigning the ItemHide action to the close button.
Click on the smart shape with the X, click the “Use as Button” option, set the On Success action to “Execute Advanced Actions” and select “ItemHide” from the list of actions.
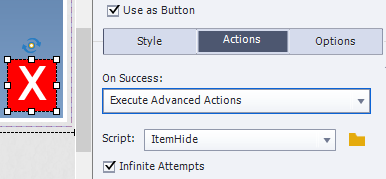
Setting the hide button action
Lastly, create a button on the slide that appears at 0 seconds, set the text to “Show” and set it to Execute Advanced Action and the action “ItemShow.”

Setting the show button action
Now you can preview the project. When you click the Show button prior to the 10 second pause button the slide will pause and the AllProject group will show. When you click the hide button the slide resumes and the AllProject group will be hidden. When you reach the button that pauses the slide, clicking the show button still shows the AllProject group but closing the group won’t unpause the slide.
HOW IT WORKS
You can check out the published file here.
When a button is set to pause a slide, it changes the cpCmndPause value to 1. So the first decision of the Show button’s advanced action checks to see if the cpCmndPause value is equal to 1 meaning the slide is already paused. If it’s not equal to 1, because the slide is playing, it assigns the v_ProjectPause variable to 1 and the cpCmndPause variable to 1 which then does pause the slide. The second decision of the action then shows the AllProject group.
When the close button is pressed, the second decision of the advanced action hides the AllProject group. The first decision looks to see if the v_ProjectPause is equal to 1. If it is equal to 1, v_ProjectPause is assigned a value of 0, which is what resets it for the next time the show button will be used, and it assigns cpCmndResume with a value of 1 which is what unpauses the slide.
WHY THE SECOND DECISION?
For something as simple as showing or hiding a single group you don’t really need to put the Show or Hide action in a second decision. You could put it in the ACTIONS and ELSE sections of each Advanced Action, but this means you have to enter it twice, one for each section, instead of only once in a single decision.
