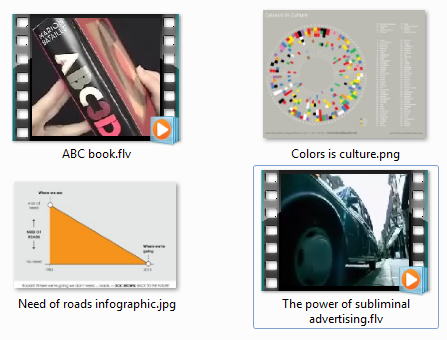
The Windows feature of showing icons on thumbnails should be a no-brainer. When you view the thumbnails of files in Windows explorer, an icon of the file type should show in the lower right corner of the thumbnail. Granted, this would only be true of files that allow a thumbnail view such as images and videos, but the default implementation of it only works for videos. The icon is then only associated with the program set as the default for handling the file type and not an icon that shows you what the file type actually is. With a quick registry setting, you can modify any file type so that it shows a custom icon over the thumbnail, for files that allow thumbnails, regardless of the application that opens the file.
If you’ve enabled this feature in Windows you’ve found that the icon on thumbnails only works for video files. For images you do get a thumbnail view, but you don’t see an icon.

Videos show a WMC icon but images have nothing.
When I’m designing, I will have multiple files that all have similar content. First an Illustrator file that contains the vector template, a photoshop file where I’ll setup the pre-image template if I’m dealing with a lot of raster images that are swapped out, and finally all the files that are created from the Photoshop file, such as .png and .jpg. The thumbnail view of these files is usually identical which means looking at the file extension is necessary to know which file is which. Having to look at the file extension isn’t really that big of an issue, but if there were icons on the thumbnails, like you see with videos, you would be able to identify the file you want more quickly.
Each thumbnail is the same so checking the extension is necessary.
After consulting a few forums and inquiring about this issue to some tech friends, one person was able to tell me how to show the icons on a thumbnail and how to set a custom icon based on the file type.
CREATING THE ICONS
My first task was to create icons that make it easy to identify the file format. The icons will show at a maximum size of 48×48 pixels using the largest thumbnail size, so legibility is the main priority should you use a smaller thumbnail preview. I selected a condensed sans-serif font as that would allow the text to fill up as much of the real estate of the icon as possible as it’s taller than it is wide. To help the text stand out I placed a blue box behind it and set the text to white.
While it’s only going to be displayed at 48×48, I still like to work with larger sizes for icons should I want to use it in another setting.
Using an .ico format plugin for Photoshop, http://www.telegraphics.com.au/svn/icoformat/trunk/dist/README.html, allowed me to save the file in the .ico format without having to save it in another format first and then convert it to .ico using a separate program. Make a note of wherever you save the icons as you’ll need that in the next part.
MODIFYING THE REGISTRY
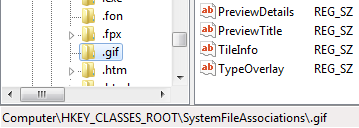
The secret to getting the icons to show on the thumbnails is adding an entry to the system registry, which is accomplished by accessing the Windows registry editor, regedit. The specific path needed is HKEY_CLASSES_ROOT\SystemFileAssociations. I know that I only want to have .gif, .jpg, .png, and .tif files use custom icons so I first went to the .gif section of the registry.

Please be careful when editing your registry.
An entry for TypeOverlay shouldn’t already exist, so you right-click in the window and select New > String Value. Enter TypeOverlay as the name of the value and press Enter (no spaces in the name, type it exactly as it’s shown. Right-click the new entry and select Modify then enter the file path of where the .ico file is and the name of the .ico file. On my computer it’s F:\SkyDrive\networked files\icons\image formats\gif.ico. Repeat this process for the rest of the file formats and then close out regedit to complete the changes. (The completed entry in the registry should have the ab icon, be named TypeOverlay, have a Type of REG_SZ, and have a data value of the path to the icon on the computer.
CLEANING OUT THE THUMBNAIL CACHE
The last step is to clear out your thumbnail cache. When you set a folder to view thumbnails, Windows stores the thumbnails so when you return to the folder it doesn’t have to re-examine all the files to get new thumbnails. So, it’s necessary to clear out the thumbnail cache in order for Windows to load the thumbnails with the custom icons.
I use the program SageThumbs to do this as it allows me to clear out the thumbnails and has built in support for giving previews of Illustrator and Photoshop files, http://code.google.com/p/sagethumbs/. After downloading and installing SageThumbs you’ll have to reboot your computer. You can access the SageThumbs main interface by either loading the program from your start menu or right-clicking on an image file and selecting SageThumbs > SageThumbs Options. In the lower left corner are two buttons for the thumbnail cache. Click the Clear button and then click OK to close the window. SageThumbs will clear out the cache and enable or disable previews for any files listed under the supported file types that are checked or unchecked.
Now you will have icons over thumbnails that indicate the file extension and not just the default program they’re associated with.
Now it’s easy to see which file format each image is.
The benefit of taking the time to set this up should be obvious. In the past I’ve always just worked in detail view but as projects grew larger and I had to create multiple formats for images due to their different destinations, using thumbnail view proved to cut down on the amount of time I spent searching for specific images. The lack of the icon was the biggest hindrance but now my workflow is streamlined with icons showing on my thumbnails as it’s easier to identify a large blue icon on a thumbnail than it is to read the small text under each thumbnail.
In the future I’ll probably make the differences between the file format icons even more diverse with a variety of coloring, but for now the icons work quite well.